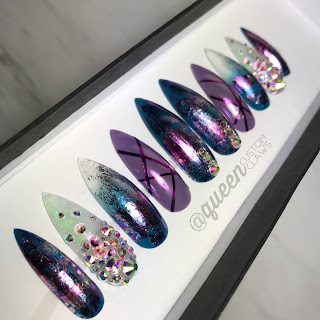
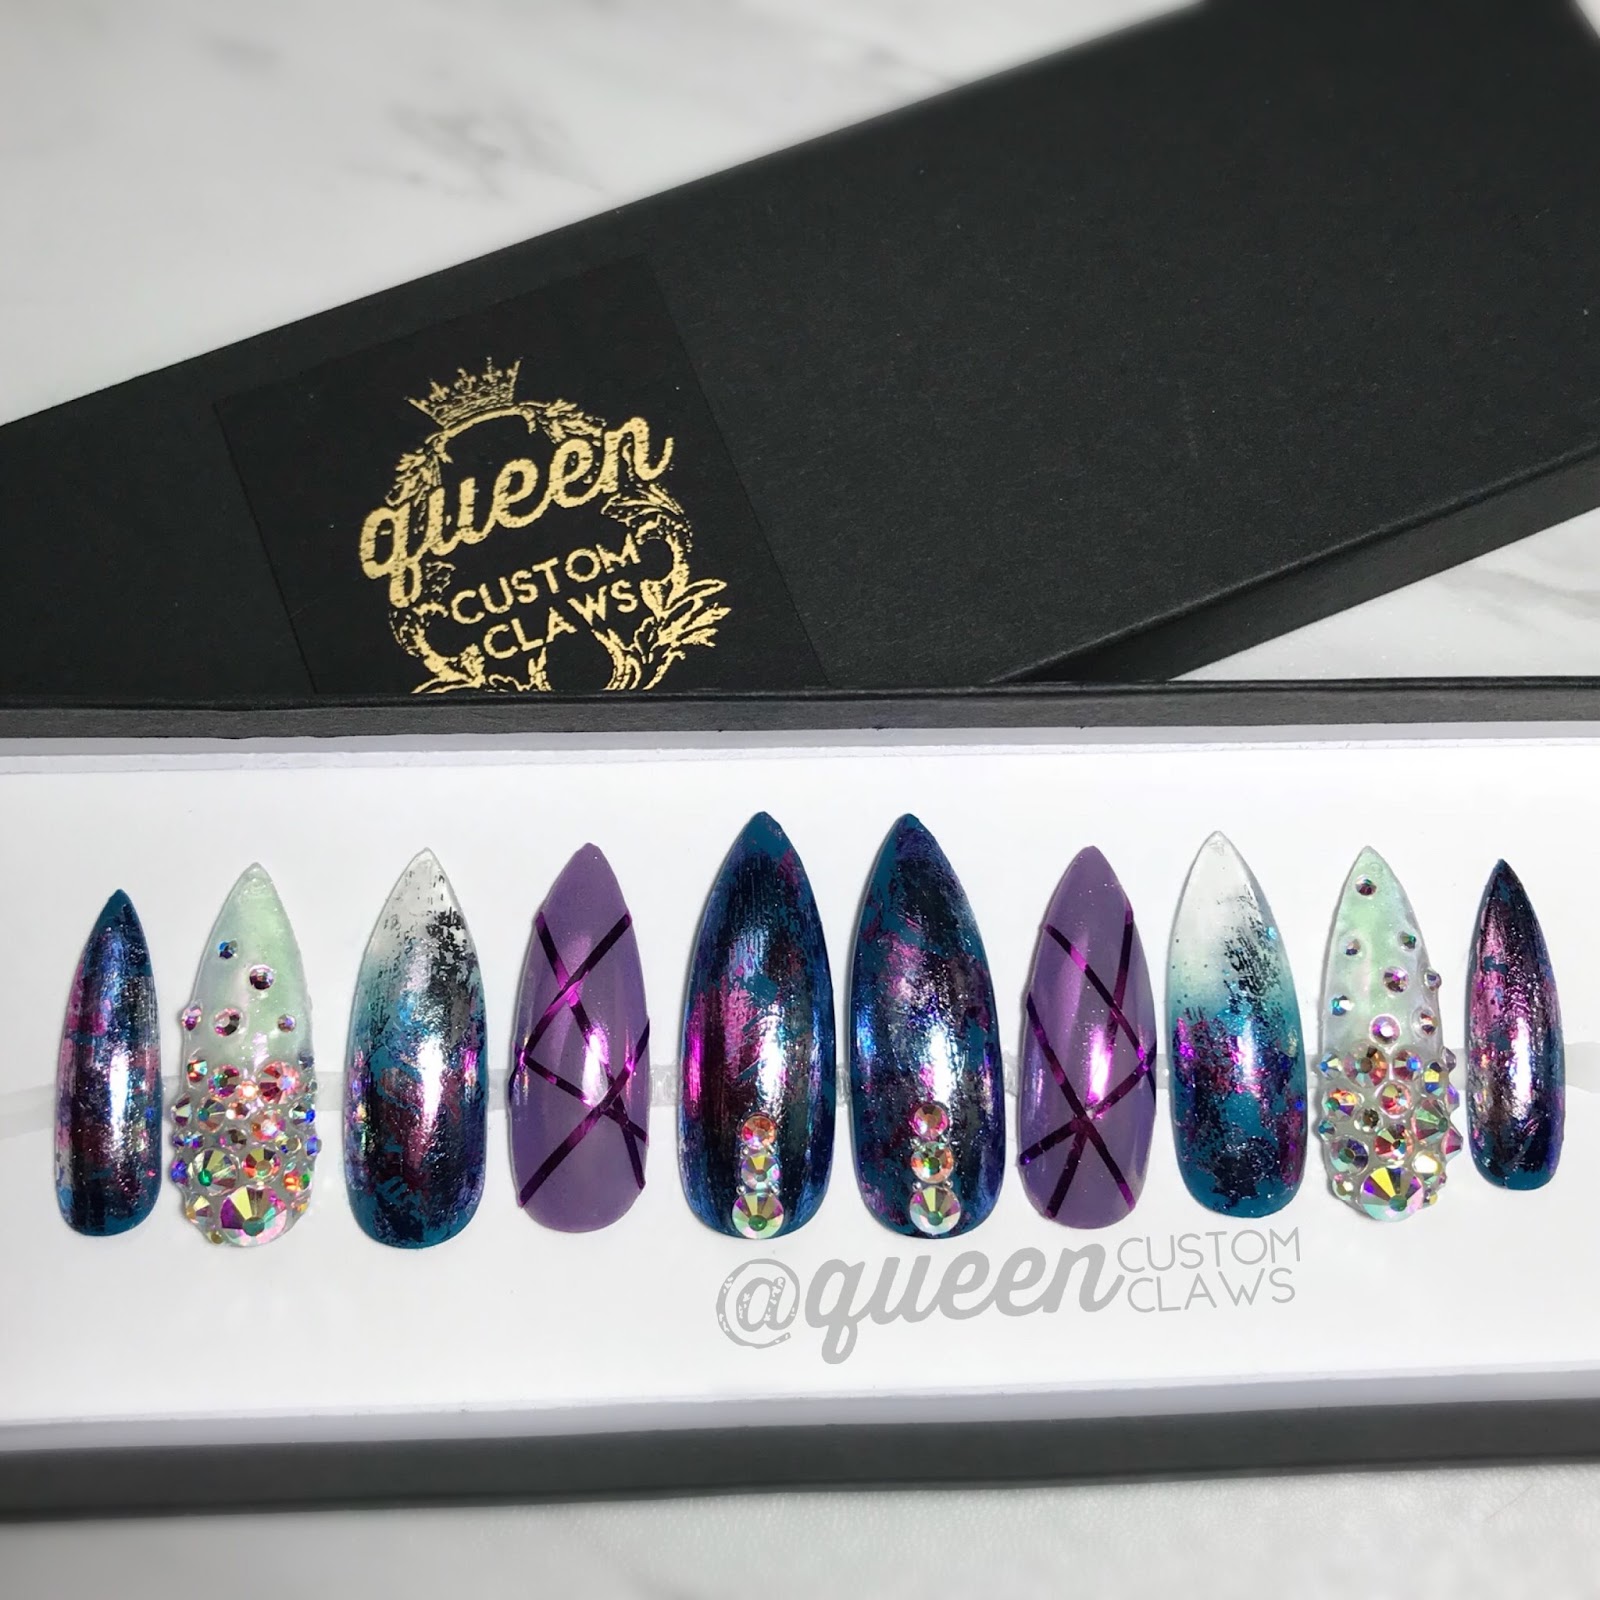
Friday, November 20, 2009

m45 Black & White

I have only ever done this plate design once, but i definitely like it. It could be done 2X in different colors, slightly offset to make it look like plaid. I plan on trying this technique for Christmas.

Here's what you will need: m20, m45, a sheer blush ( I used china glaze here, but i have added more red to it so it has a more blushed color) any white for the french tip, SP in black, and a polish pen stripe brush for the aqua line & dots on flower.
Here's how to do it:

1. Polish your tips white and stamp tip design m45 over the white.

2. Clean the smile line to wipe off any extra white. Paint sheer blush on the bottom 1/2 of your nail.

***** If you have a steady hand, and can paint a french tip freehand WITHOUT having to clean up the smile line, then go ahead and start with the sheer, then paint the tips, and follow with the stamp....actually, because you will be painting the stripe over the smile area, you don't have to be perfect. I originally planned on just doing the tips, that's why I did it in this particular order. The stripe was an afterthought.


4. Stamp m20 flowers on your thumb

5.Finally use the polish pen/skinny brush to paint a line along your smile. finish with dotting the center of your flowers with a co-ordinating color or the same color.

Wednesday, November 18, 2009

Grey Floral Leopard

Its been a long time since I have blogged. Believe it or not...I have been doing everyones' nails...gels too, plus my own, so I have been spending waaaay too much free time playing, not blogging. I am putting aside a day to upload pics and design the demos. I may save them so I can post more regularly. Thanks for peeking in to see what I finally posted.
I did these on my mom. Wild for her, I know...but she loved them anyway.
Here are the supplies I used: plates m31 & M57, a base gray color (drugstore find Sally Hansen Gunmetal) Konad SP polish in black & white. you can add crystals to the flower to finsh.

Here's how to create these nails.

1. Apply base color

2. Stamp leopard print over entire nail. Layer white flower over each nail. I used just one of the flowers from the image. to do this, either paint only one flower & scrap away from the other ( avoiding it) or simply just remove the unwanted flower.

3. Bling. Add crystal to flower center. If you don't have any crystals...simply drop a dot of your favorite sparkle/glitter polish.

Saturday, October 31, 2009

Super Spiderific!

I have totally fallen I love with the the spider designs. Pretty much most of the halloween designs have incorporated at least one of the spiders.


This lace design is also one of my favorites.  So I have done atleast 4 halloween Mani's with the lace. The lace below is done the Konad Black Gold color where the spiders are black.


Both designs re pretty basic.
1. Paint blush over full nail
2. Paint tips.
3. Stamp tip design over tip or along the time line.
4. Stamp on little spiders
5. Add a crystal to each big spider!
Super spideriffic!

Friday, October 23, 2009

Blood Dipped Tips


I'm Finally getting around to blogging the tutorial for these pretty basic and fast nails. I originally found the base nail design (bloody tips) on another nail blog. SADLY.........I cant remember where I originally saw it, though I have searched. SO if any one recognizes this design...
PLEASE COMMENT BELOW WITH LINK, i want the designer to be properly credited.
Any how, when I saw it, I loved the design immediately. So, when Halloween designs were swirling in my head, I remembered the wonderful bloody tips! Here I simply added the skull, and created an accent nail
*************************************************************************
EDIT FROM ORIGINAL POST:
Thank you Trinca for finding this picture and web page. Nihrida created this amazing manicure: the original manicure I used for my inspiration.
Very Beautiful, and the red is SO VIVID, way better than mine.. If I had I remembered where I found it in the first place..I'd have read to see what red she used. Please visit her website to see all her amazing work. I'll never forget her website now....because I'm gonna add it to my Blogroll.
********************************************************************
Here's what you'll need:
Black base color, red polish for accent nail, and tips. White & Black SP polish, and plates from the BOO! Kit. m13, m28
here's how to create the look:

1. Polish all nails with 2X base color

2.Stamp images. I do this first because the painted tips take a while to dry. Rather than wait the drying time before konadding, save time, konad first!

3. Polish tips with red in a sloppy bloody pattern, being careful around the skeleton image.

Of course this idea occurred to me AFTER this konadi....on the next Konadi I did for my M-I-L. But, i think it would look great on these nails!

Tuesday, October 20, 2009

Nails Night Out

l
Beauty industry top mavens and cosmetic elite join together to paint the town red and their nails too, for the first stop on the Nails Night Out national beauty event


Nails Night Out kicks off in New York in partnership with today's top lacquer brands including Rescue Beauty Lounge, Rescue Beauty Lounge, Nailtini, Priti NYC, Color Club Nail Polish/Forsythe Cosmetic Group, Barielle, Jesses Girl Cosmetics, Nailtini, OC Nail Art, Carol's Daughter, White Lies l Color Truths and PeaceKeeper Cause-Metics.


New York, New York (PitchEngine.com) - Nails Night Out is a gathering of bloggers, beauty editors, creative directors, lacquer lovers, and beauty/cosmetics junkies for a night filled with polish splendor. Traveling the nation, Nails Night Out will stop in multiple cities to fulfill their mission of spreading color and beauty to the world. Join self - admitted nail polish addicts for their first stop on this national beauty event, Nails Night Out NYC! on October 24, 2009 at the Beauty Bar NY from 7:30pm - 9:30pm.


Nails Night Out has been featured in AllLaqueredUp.com, 52flavors.com and more with top beauty bloggers all abuzz for this first ever lacquer focused series of events. Ji Baek (Founder, Rescue Beauty Lounge), Michelle Olson (Founder, Nailtini), and Kathleen Highland (Owner, OC Nail Art) are the specially invited guest for the inauguration of this colorful affair. Girls will expect a night filled with new color launches, polish swaps, crayola inspired martinis, beauty talk, desserts and gift bags to die for. Supporting women from their expression in color to their well - being, proceeds from Nails Night Out will go to benefit Breast Cancer Research. Tamara Odom (Nails Night Out Organizer) states, "Nails Night Out is for the kind of woman who loves nail polish,makeup, and color. She raves to everyone she knows about the latest in lacquer, she sets trends and takes cues from her favorite celebrities and she knows that nail polish is an ultimate accessory."

Join Nails Night Out as they kick off Nail Night Out NYC! on October 24, 2009 at the Beauty Bar NY from 7:30pm - 9:30pm. For more information on how to attend and tour schedule visit http://event.pingg.com/NailsNightOutNYC and join the conversation at www.twitter.com/nailsnightout

Monday, October 19, 2009

And The Winner Is...............

Thank you all for emailing me some of the most unique and beautiful KONADicures out there. I have selected the konadicures which really caught my eye. Because some people just have beautiful nails...no matter what they paint them like, it was hard to decide on my favorite konadi.
Here were my top three favorite.

Reader Joan S of BC, winner of the Boo Kit found my Favorite Konadicure, one posted on the polish or perish website.

Reader Paige Kennedy found this image on Kroniclesof a Konad-er blog. Awesome job -error>powerliftchick.


Bonni Yang Of Canada found this beautiful image at wow wow nails.
Thank you so much for all of you rewsearching the variouse Konadicures out there and sharingthem with me. I hope the search cultivated some inspiration for your konadi's as well. Please- send me your photos f YOUR konadicures....I'd love to feature them on my blog!
This post was longer...I couldnt stop raing about all the previous konadicures....but my blogger CRAPPED OUT ON ME.......NICE! didn't save much but the images.....running out of time....so I have to post it as brief as it is ;(
Please click all pictures to link back to the VERY TALANTED artists who created these konadicures!
This Give-Away has been GENEROUSLY Sponsored by OCNailart. So, that awesome Boo! Kit Joan just won.....it's available exclusively @ OCnailart!

Saturday, October 17, 2009

Halloween Happy Nails!

Cant help it...I just think these nails are happy!that's why I called them Halloween Happy nails. I used elements from the new Boo! Kit and the Coraline kit. I think any of the Coraline kits are great for Halloween too.

Here's what you need:


1. Plates m28, m13, & co6
2. you will also need a sheer base pink/blush


3. A konadable black polish, and any orange color for the tips and accent nail. Again I used a color from the tattoo taboo OPI kit
1. Paint sheer blush over all nails
2. Paint orange on the tips and over entire accent nail. I used 2X coats.
3. Stamp black Coraline tips. I used 2 different tip designs and alternated them every other tip ( not including the accent nail)
Follow with a spider stamp on each nail. I added two for the thumb so it would cover more. It make for an interesting design if each spider is in a different angle.
4. Use the Jack-o-Lanteren for the accent nail.

This is a pretty fast design if you freehand the orage tips over the blush. If you are not as fluent with painting your tips...you could do that FIRST, then clean the smile line with an acetone soaked brush, then pain blush on bottom 1/2 of nail. But I think here the Coreline tips help cover any small imperfections,
and it is a very forgiving design because of the space inbetween each graphic. Some of the other tips HAVE TO BE PERFECT and can be trickier.